Dexcom G7 - Known issues
This page is not giving you medical advice or treatment advice, and that is very much on purpose! I am not a medical professional, and even if I were, I don’t know your personal circumstances. If you need medical advice, consult your physician! If, at any time, you have reason to doubt your G7 readings, use one or more finger-stick measurements to confirm your G7 readings. Base your treatment decisions (bolus, etc.) on the finger stick reading, and in accordance with your physician’s instructions.
For users with an insulin pump controlled by the G7: Until you have reached a full understanding of your G7’s behavior and when, in your particular case, its readings can be trusted, you may need to double-check, as frequently as necessary to give you confidence, with finger stick readings. Read the page on reading comparisons for important information on interpreting the differences.
Pages
- Introduction
- How it works
- Accuracy and Calibration
- Comparison with finger stick readings
- My Sensor Failed
- Known Issues
- Contacting Dexcom
Dexcom G7 - Known issues
Known issues fall into a number of categories, each discussed below.
Insertion problems
Goosenecking
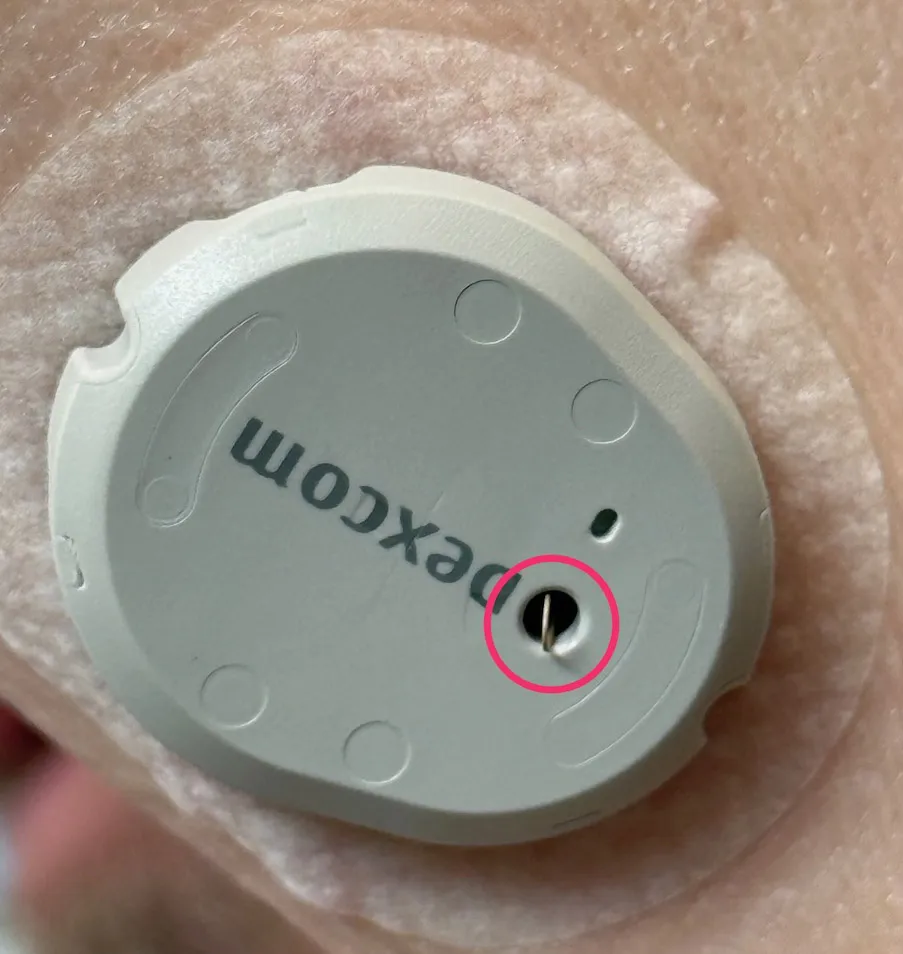 In 2025, an insertion failure known as goosenecking became prominent. It is a scenario in which, for any reason, the needle and filament do not penetrate the skin, or do not penetrate it sufficiently, during application. The filament needs a place to go, and it then loops back up through the hole in the sensor. The resulting “loop” can stick out of that hole or be visible inside it and looks like a goose’s neck, hence the name.
For months, there were many complaints about this, and eventually Dexcom admitted to a manufacturing problem that, by then, it had supposedly corrected. That said, the supply chain and Dexcom warehouses may have been full of large quantities of G7s with uncorrected manufacturing defects. Dexcom chose, or so it seems, not to proactively replace those, but wait for failure at the user’s end. Then, upon request, one could receive a replacement. They must have calculated that was the fiscally best solution for them, but of course, that does not attribute any (negative) value to the user experience.
It may be that, as I write this in early 2026, the problem is occurring less often. I doubt it will fully go away.
Filament/needle misalignment
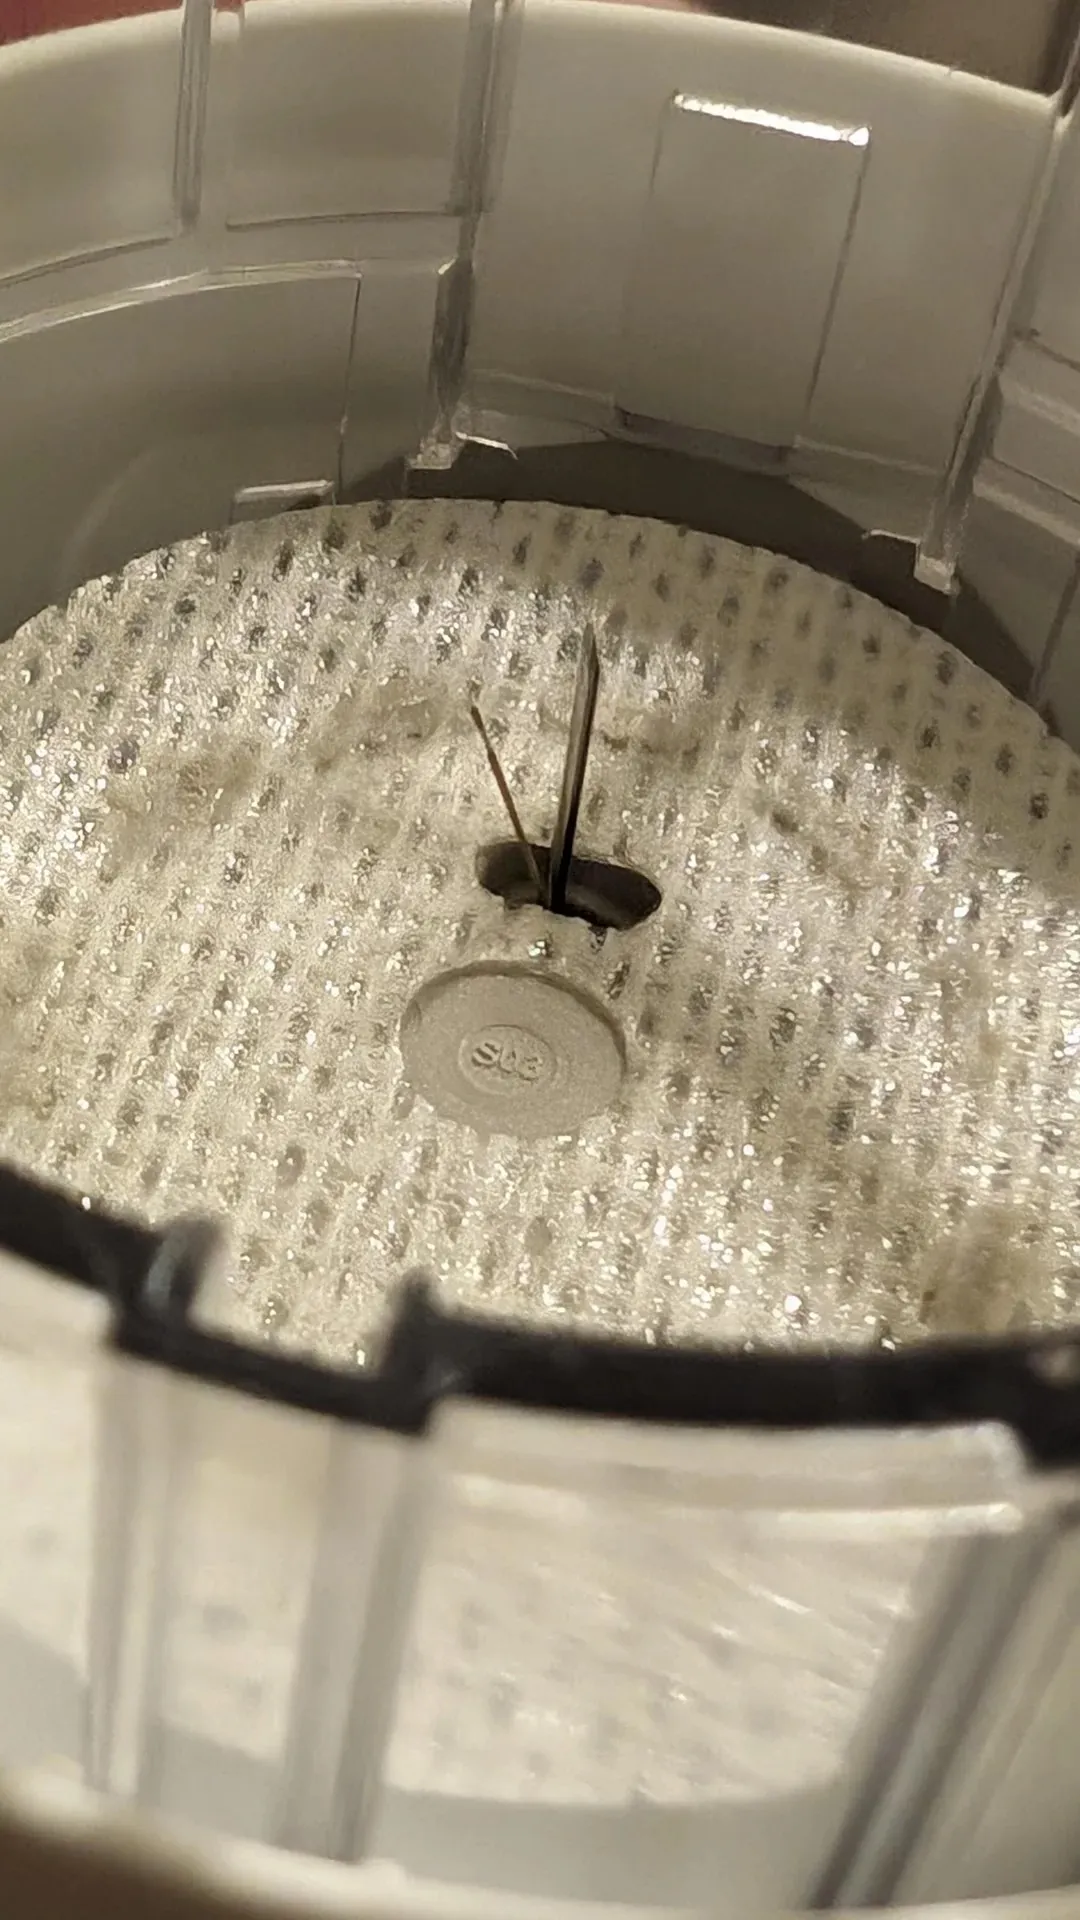 As the image shows, it may be worth your while to inspect the inside of the applicator before putting it against your skin and pressing the button. The image shows an example of what I call filament/needle misalignment. The filament is supposed to be fully enclosed by the needle. If it is not, as in this case, there is a virtual guarantee that when you push the applicator button, the filament will not penetrate the tissue and may bend to the side. Either way, the result will be a failed sensor.
If you encounter this situation, I suggest taking a photo and contacting customer service before trying to apply.
Bleeding
Another issue that may occur is bleeding, sometimes quite a bit. Bleeding happens if the insertion needle punctures a small vessel. It is a random and, at times, unavoidable event. The bleeding, even if it seems a lot, should stop (unless you have clotting issues, in which case it may take longer). It is said that “bleeders are readers,” meaning that these situations often result in a well-functioning sensor. You can gently wipe up blood, but don’t put downward or sideways pressure on the sensor!
Pairing does not happen
Occasionally, the magnet-driven power-up mechanism on the sensor fails. The sensor either got powered up somehow during storage or transport, or the magnet removal failed to “flip the switch” in the sensor.
In the former case, the battery may have died, and you have no chance of recovery. A call to customer service is in order. In the latter case, some users have tried to bring a magnet, removed from an old applicator, close to the sensor (where it would have contacted inside the applicator), and then moving it away. If you don’t want to try this or it fails, contact customer service for a replacement.
Omnipod issues
Users have reported issues pairing the Dexcom G7 with the Omnipod 5, even though the Dexcom G7 pairs with the user’s phone without incident. This is true when using the Omnipod’s dosing device and the Omnipod app. This most frequently occurs when the Omnipod and G7 sensor are located on opposite sides of the body.
As noted earlier, both devices are battery-powered and energy-conscious (perhaps a little too much). Signal strength and reception sensitivity may suffer. This is now a “handicap” for both sides, as the large body mass between them creates challenges. It is not unusual for the pairing process to be a bigger problem than ongoing glucose value communications. This is so because an intermittent problem just results in no new reading. The pairing process, on the other hand, is critical.
It is suggested that, when you encounter pairing communication issues with devices on opposite arms, you cross both arms tightly during pairing. This will increase the likelihood of success in that phase. During the “measurement” phase, occasional missed readings can slow the Omnipod’s response to changing glucose levels. If the “gap” is too long, the Omnipod will alert the user, and manual intervention (manual dose(s)) will be needed.
General advice from Omnipod is that one should change arms after every 4 “pods.” Each pod lasts 3 days, so you would switch arms every 12 days. The G7 lifetime cycle is between 10 and 10.5 days, so maintaining a 100% overlap on the same side is difficult for at least 1-2 days. On subsequent “cycles,” you may have to switch sides after 3 pods, sometimes, to keep things optimal.
Reddit user “Livid-Brain5493” used commercial measurement devices and found that the radio energy emitted from the G7 is about half that of a Bluetooth mouse, measured at the same distance. This confirms the energy conservation approach, but leaves undiscussed whether the chosen signal levels are optimal for both energy conservation and communication success.
Near-immediate malfunctions
There was a period where Dexcom had manufacturing issues, which they only admitted to after many months and many complaints. One issue caused units to be produced with the filament insertion process occurring at an uncontrolled or undesirable angle, or sometimes the insertion needle was missing. The overall result was often a partial insertion, and/or at the wrong angle (and therefore not deep enough).
The good news was that the sensor startup process would generally detect a problem and declare “Sensor Failed” very soon, so you wouldn’t have to deal with weird readings. The bad news is that each such case causes a user to go through the replacement request process (it was always granted).
Adhesion issues
There is adhesive on the underside of the “white cloth” sensor backing. Dexcom supplies a simple overpatch with each sensor and tells you to apply it to “protect” the sensor (from being disturbed and from water). It uses an adhesive as well.
Overpatch issues
Many users experience poor adhesion of the Dexcom-supplied overpatch, which spontaneously comes off or loosens long before the sensor’s lifespan is complete.
If one attempts a “repair,” it is not at all unlikely that one will” actually remove the sensor’s adhesive backing (the white cloth) from the skin as well, making the situation worse. Not repairing can cause problems with showers and other fixtures.
Users report that a regimen of thoroughly cleaning with an alcohol swab, letting the skin dry, and then applying Flonase (an OTC nasal spray; don’t ask how this was discovered), or a substance called Skin Tac (a liquid adhesive barrier). After that, one applies the sensor and overpatch.
Other approaches involve using third-party over patches, which supposedly perform better in both adhesion and protection.
Yet another approach involves Tegaderm™, which some apply to the skin before sensor application, and others use as an overpatch.
Over time, I have migrated to: alcohol cleaning, applying a Skin Glue wipe, inserting a sensor, applying a third-party overpatch (Lexcam) that sits around the sensor, and then covering the whole with Tegaderm. This approach has, for me, resulted in a near-indestructible setup with no water-related issues (although I don’t swim).
There are also reports of users experiencing great difficulty removing an expired or faulty sensor due to extremely strong adhesion. This is almost the opposite of the “overpatch falling off” issue. It just goes to show that the actual situation may depend heavily on the individual user’s skin properties, sweating, showering, swimming, and possibly the application technique.
Often, applying one or two alcohol swabs to the overpatch, then waiting a minute or two before attempting to peel off the overpatch and sensor, works well. Your mileage may vary!
Allergy issues
Some users report skin allergies to the adhesive on the underside of the white sensor cloth and, sometimes, also the Dexcom over patch. Some overcome this by applying something like Tegaderm first, provided that those users who do not experience an allergic reaction do not.
Measurement Quality
Some of the issues I describe here are easy to observe on the graph and may be confirmed by fingerstick measurements. Others, such as hypoglycemia, may be harder to detect. Some users notice the onset of this condition easily, while others do not, which makes the issue more concerning.
For some users, like me, once a newly applied sensor has stabilized (for me, within 2-4 hours) and perhaps been calibrated once or twice, the G7 is consistent and tracks my finger stick checks well within 20 points. I always check several times during the first 24 hours and calibrate as needed (making sure I am stable). More than half the time, calibration is unnecessary.
Others’ experience is not like that. I hope the information presented here helps everyone adopt the suggested practices and have a better experience. That said, I am convinced that T2 users generally fare better than T1 users, and this may be a difficult problem to solve.
Fluctuations
There may be issues where readings fluctuate wildly. If that happens within the first 24 hours after insertion, it may be annoying but is not necessarily a problem with the sensor’s functioning. Despite the suggestion that the sensor is ready to go after the 30-minute warm-up, the quality of the measurements produced in the first 24 hours can vary. For some users, like myself, it is usually correct and consistent within a short period after warm-up. For others, it can take up to 24 hours. This characteristic is usually consistent across sensors for the same user.
Some users who experience issues for at least 12 hours have taken to a habit they call “soaking.” This means they will apply a new sensor around the time the grace period for the current sensor begins, without removing the still-active sensor. They insert the new sensor into a new location but do not notify the receiver or application. The insertion process activates sensor startup, as discussed, but since the application is unaware of this, it continues to report readings from the current sensor. Then, when the grace period is over, you pretend to insert the new sensor right then and there (but it has already been in place for quite a while). The idea is that, at this point, the new sensor’s “wild hours” are over.
The downside is that you lose the grace period in terms of usable lifespan of each sensor, and that, for a while, you wear two at a time. You may also experience simultaneous pairing offers. I am not advocating for this practice!
If you are outside the 24-hour initial window, and your glucose level is stable, and the G7 has perhaps also been calibrated, problems like this are extremely rare. If, under stable conditions, comparisons with fingerstick measurements are concerning and not readily explained, and you see this more than occasionally (with the same sensor), you might have a problem. These situations can result from a partial filament insertion, a defective sensor, or other factors. In these situations, it is best to contact Dexcom support.
Extreme lows
Extremely low readings might be correct, particularly if you are not sensitive to detecting side effects. On the other hand, they can also occur when abnormal pressure is applied to the sensor.
If pressure is applied to the sensor, the underlying tissue is compressed, which may temporarily expel a portion of the ISF and/or impede glucose transfer. This can cause artificially low readings. Depending on sensor placement and sleeping habits, this can happen to some during sleep, and it can also occur when tightly fitting clothing presses on the sensor. Other “pressure” incidents at other times are usually too brief to make any difference.
If you experience these low readings, try to rule out a so-called “pressure low” by changing your sleeping position or clothing. When applied to the back or side of the arms, there usually is no problem for back sleepers, but side sleepers might have a problem. If you cannot easily change your sleeping position, you may try moving the sensor position on your arm, so it is not under pressure when sleeping on your side. Do this when you apply your next sensor. It may take some experimenting.
Unexplained rise in the morning
This can be due to a phenomenon known as “feet on the ground,” which involves” the body’s natural rhythms and increased cortisol production around wake-up time. It usually manifests as a gradual rise in glucose level, despite not having eaten for hours. If you are concerned that it is something else, consult your physician.
Reporting issues and requesting replacements
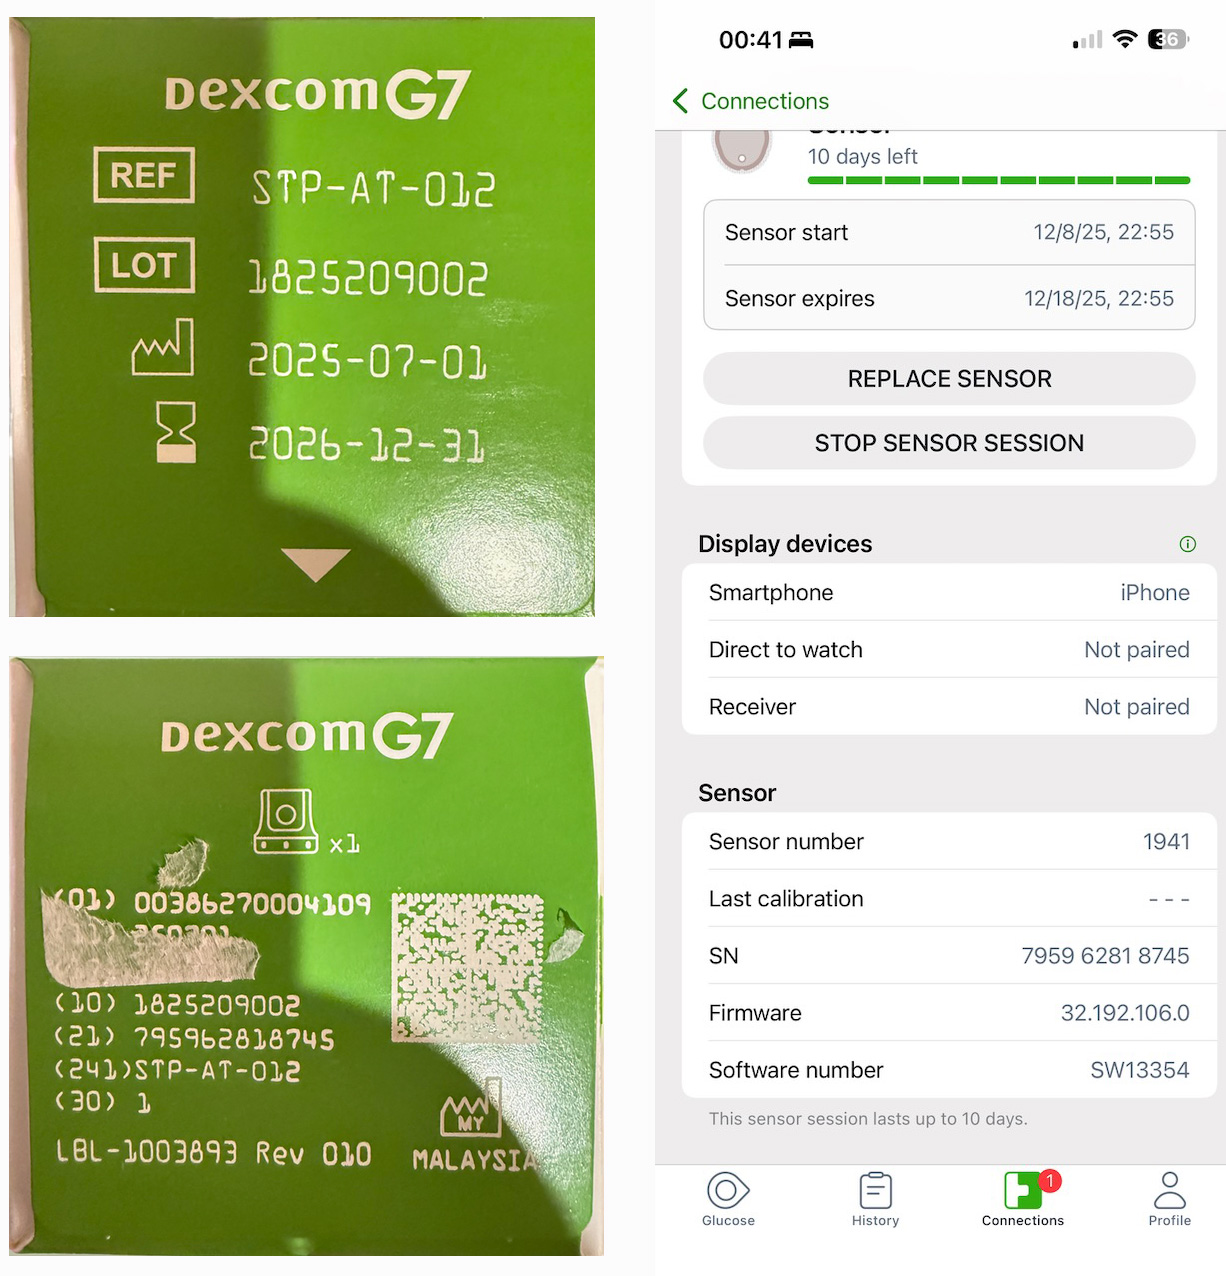 If you contact Dexcom to request a replacement, they will always ask for your sensor serial number and, occasionally, the lot number. These numbers are printed on the box that your sensor came in. You should therefore keep the box until your sensor naturally reaches the end of its life and is replaced by the next one. That way, you will have it available to get the information from. Alternatively, you can take a picture of the box and a screenshot of the sensor information page from the application for future reference.
In the sample picture, the serial number is found after the label “(21)”. The LOT number is found on the opposite side of the box. The serial number is displayed in the screenshot, but the LOT is not.
On occasion, when offering you a replacement, Dexcom may ask that the failed sensor and, sometimes, the applicator be returned. In such cases, they will send the replacement along with packaging materials and a shipping label. Since they may forget to tell you, do not discard your old materials until you know you will not be asked to return them.
Cumbersome and time-consuming
Even when using the web form or the in-application replacement request, many fields must be filled in. With the exception of the sensor’s serial number, much of the requested information would be identical from request to request. Users wish they could log in first and have the form pre-populated with values from prior submissions, saving a lot of time. So far, this has not happened, except for a small change in which, apparently, the serial number is now pre-populated from the internal database (I have not experienced this myself yet, since my failures are infrequent).
Even worse, perhaps, is that when you attempt to chat, you have to fill out a similar form, with all those same issues, and then the customer service agent, once you get one “on the line,” will ask many of the same questions again.
Another reported issue with chat or phone contact is that customer service agents seem to be forced to go through a script where they are asking a whole bunch of “standard” questions (did you clean your arm, did you use an overpatch, etc.), that sometimes do not even pertain to the issue at hand. It is not unusual for the user calling to be more knowledgeable about what is happening than the agent. You have to get through all this to finally get your replacement approved.