A fan upgrade for the Terramaster F4-425 Plus
Introduction
About four weeks ago, I replaced my three NetGear ReadyNAS and UltraNAS units with a single Terramaster F4-425 Plus unit. The NetGear equipment was between 18 and 12 years old, and not very performant for today’s requirements (read more about it).
I’ve been quite happy with that decision and the product I chose, but one thing surfaced a couple of weeks in that was bugging me. As I started using the unit more and the load on it increased, it began to produce a noise it had not exhibited earlier. Sometimes it was a low-frequency vibration-type noise, sometimes a high-frequency whine.
After observing for a while, experimenting with pressure on the case (to rule out case vibration), I narrowed it down to the fan. Just after a cold start and for the next 15 minutes or so (depending on activity), no noise was heard besides the normal, expected hard disk noises. Even the fan was barely audible. But then the noise would come back.
I do not run the unit’s native NAS firmware; instead, I use TrueNAS. TrueNAS does not have a way to monitor fan speed (RPM), so I cannot say whether the fan was ramping up or running at a high speed when the noise was observed. However, I strongly suspected the noise was correlated with high fan RPM, so I decided to look into a replacement.
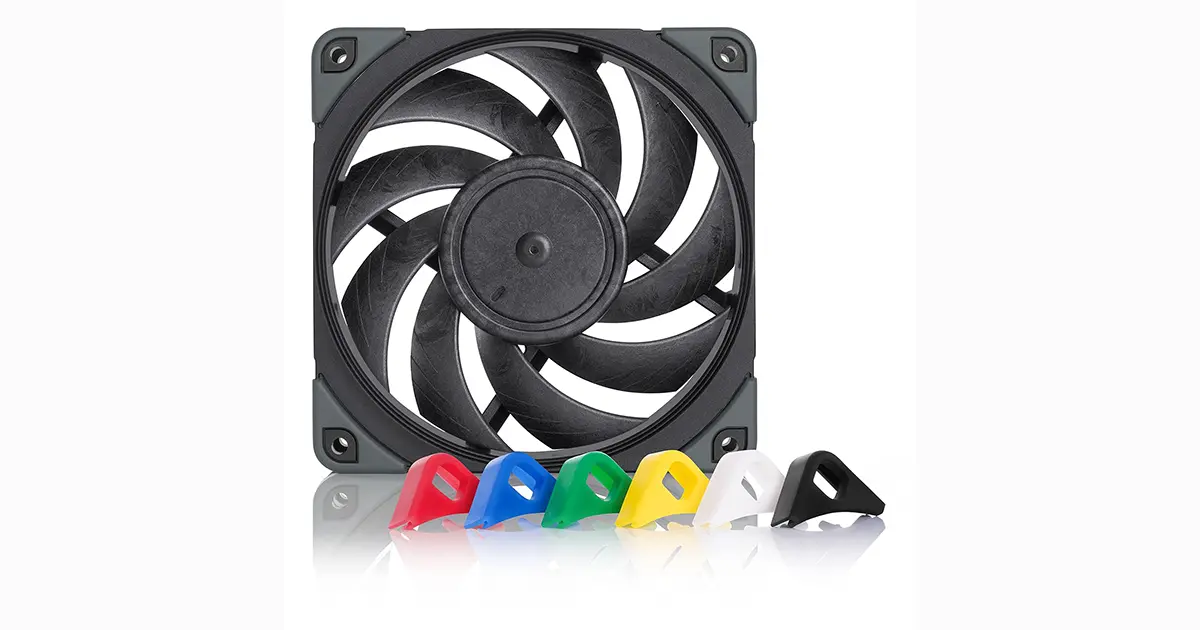
The replacement fan I chose is from a manufacturer known for producing high-quality, low-noise fans. I chose the Noctua NF-A12x25 PWM chromax.black.swap, Premium Quiet Fan, 4-Pin (120mm, Black). There is also another variant that should have worked fine: NF-A12x25 PWM High-Efficiency Quiet 120MM fan, but I picked the former because it was a better color match, although one could argue it hardly matters since it is inside the unit and only visible from the back. Otherwise, as far as I can tell, they are identical, although the black version also comes with a set of anti-vibration pads in various colors. Prices were $38 and $35, respectively.
Replacing the fan
The fan did not come with any instructions in the box! I forgot to take pictures during the procedure, so you’ll have to make do with the instructions below.
To replace the fan, I had to do the following:
- Shut down the unit and remove power, just to be sure.
- Undo four screw on the bottom of the case.
- Lift off the case.
- Undo three screws on each side to release the fan assembly.
- Carefully rotate the fan assembly and disconnect the four-pin connector (lift up on the tab and pull).
- Place the assembly on its back, fan facing up.
- Take note of the orientation of the fan so you can later put the new fan in the same orientation.
- Undo four screws on each side to release the metal side supports for the fan. You may get away without this, but I found it way easier this way.
- Undo four screws on each of the corners of the fan to release it from its mounting posts.
- You have now undone a total of 22 screws! Keep them sorted.
- Carefully lift the current fan off its posts by putting your fingers underneath on two sides and lifting straight up. This required some force and some jiggling for me.
Now, my replacement fan came with colored anti-vibration pads and a single rubber or silicone assembly/gasket for one side (I don’t know if the other unit includes that too). It still consists of the four pads (black), but connects everything with a “square” gasket for the circumference of the fan. I chose to put it on the side that goes down inside the assembly to also reduce the odds of vibration transfer to the chassis.
Both the individual pads and the whole assembly have two silicon “posts” that pass through holes at each of the four corners (a total of eight posts). When you place everything, these posts sometimes do not point straight, indicating that the post and hole are not properly lined up. It causes “bumps” on the other side of the pad. I fixed it by gently grabbing each post and pulling it down, lining things up. Be careful and don’t pull too hard! With the gasket on one side, I installed four individual pads of the chosen color on the other side.
Next steps are basically reverse assembly:
- Orient the new fan properly (see above). I actually hadn’t noticed this at first and ended up mounting it the wrong way around. Discovered it was blowing the wrong way and had to repeat the procedure to do it in the proper direction!
- Line up with the mounting posts and push down and in place. Make sure you push not too hard (but some force is required) and equally on all four corners. I had some trouble initially and basically took a small file and enlarged the holes in the fan ever so slightly, and only on the edges where the post goes in first.
- Push down all the way, ensuring the rubber all-around gasket is in place properly. The post screw holes should be evenly spaced at all four corners.
- Attach the post-screws. Do not over-tighten, but also make sure they are not loose.
- Re-attach the side supports. They have alignment holes for proper placement. Once aligned, attach their four screws.
- Rotate the whole fan assembly back in place, routing the cable so it is out of the airflow and still allows the connection to be made.
- Make the cable connection before final placement of the fan assembly.
- Attach the fan assembly to the rest of the chassis using the three screws on each side. Tighten, but do not over-tighten.
- Replace the case and tighten its four screws from the outside.
Tightening screws is important to reduce the risk of vibrations or loose screws, but particularly self-threading screws in plastic can strip their threads when over-tightened. This applies to the post screws that hold the fan in place, as well as the four screws that hold each side support in place.
You’re done.
The placement of the new fan, with anti-vibration measures in place, is a lot easier if you remove the side supports, as I have suggested. Not doing so saves you undoing and redoing 8 screws (out of 22), but it makes things a lot harder!
Results
After the initial mishap where the fan was blowing in the wrong direction, everything worked fine. I observed the disk temperatures as one indicator of the results.
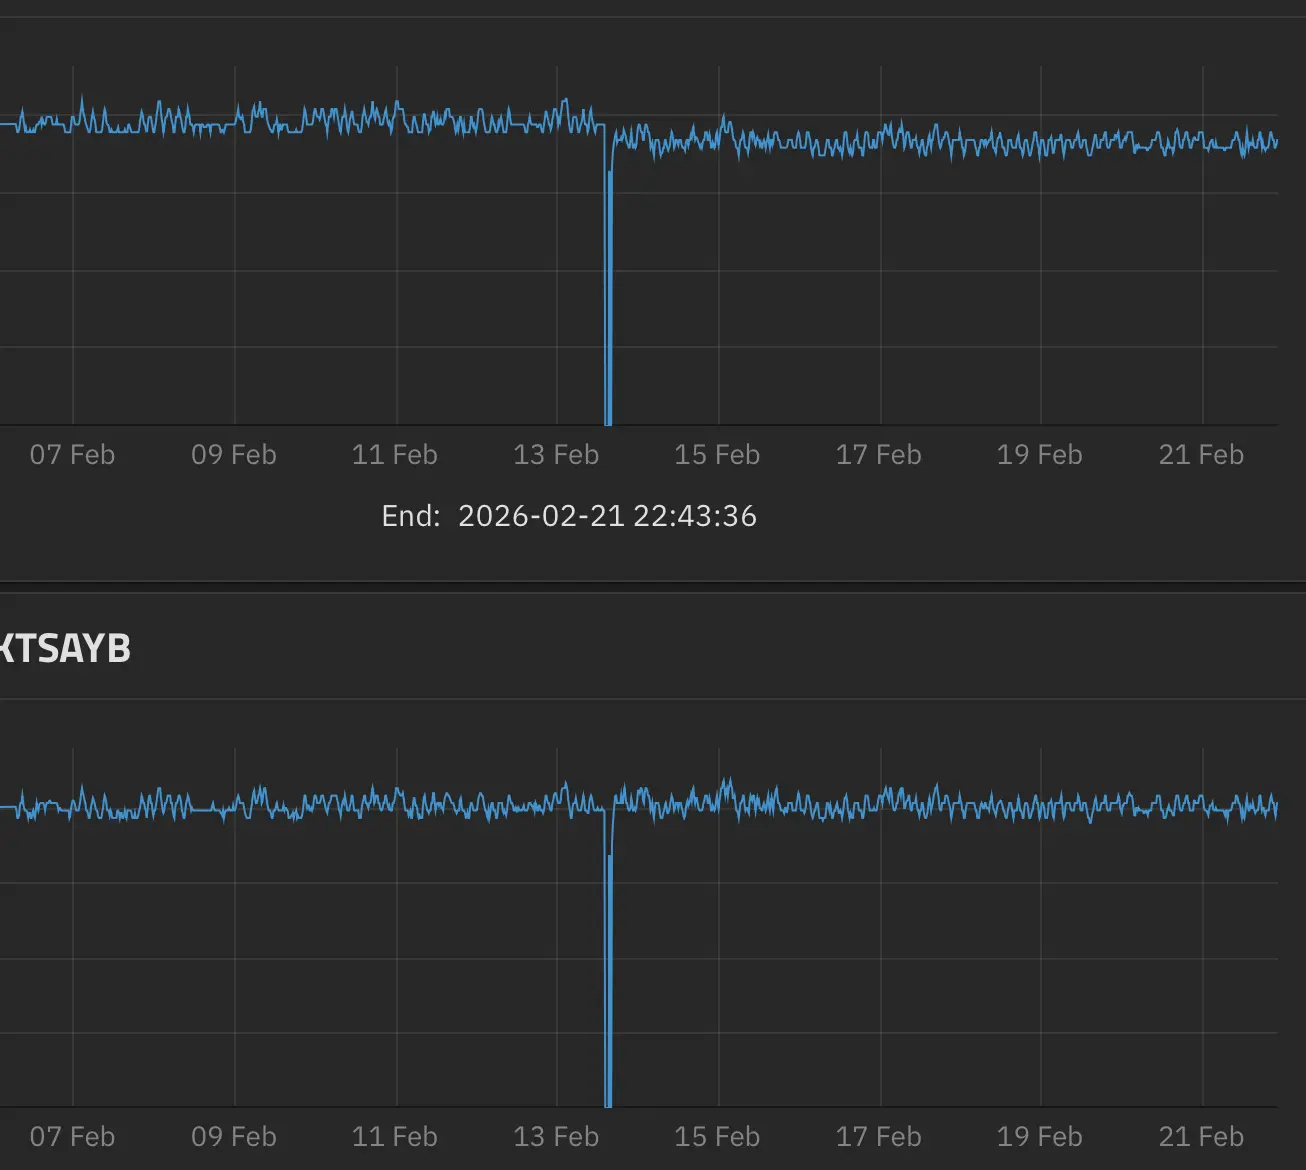
The graph shows temperatures for two disks, with the top one corresponding to the first slot (leftmost in the front view) and the bottom one to the slot to its right. Graphs for the third and fourth slots closely correspond to these two, with the third slot resembling the second graph and the fourth resembling the top one.
The big dip in the graphs corresponds to the time the units were down for the fan swap. In the first graph, you can see the typical temperature for that drive dropped a little (about 2 °C), but the second graph shows hardly any change. My conclusion is that the new fan provides more airflow overall (air is sucked in from the front and exhausted from the back), but the internal design restricts airflow through the center two units. This is something Terramaster could work on! Overall temperature control is slightly better.
The big question, though, is about the “extra” noise. My answer is that it completely disappeared. In addition, it appears to me (I have no objective measurements) that the unit’s overall noise level is slightly lower (and, compared to my NetGear equipment, it’s just quiet).
During my observations and evaluation, I realized that the internal HDD temperatures were around 38-40 °C, which is a few degrees higher than most reviews for this unit report. It is my suspicion that these reviews were based on a configuration without any NVMe SSDs installed (there are three available slots, which I have all in use), and possibly with lower-capacity drives than the 12TB models I am using. Another possibility is that TrueNAS-based fan speed control is less optimal than native TerraMaster TOS control. All of that would contribute to higher temperatures. The temperatures are by no means problematic, though!
Conclusion
For an overall investment of about $35 and about an hour of your time, on a piece of equipment you already spent $600 on for the diskless unit (I paid $599, but the price now seems to be $650), this is well worth it. Of course, Terramaster should just equip the unit with better fans overall!